Container Orchestration
The automatic process of managing or scheduling the work of individual containers for applications based on microservices within multiple clusters. Orchestration tools: Kubernetes, Docker Swarm, Apache Mesos, CoreOS rkt
Kubernetes
- An open-source container management tool which automates container deployment, container (de)scaling, container load balancing
- Can group “n” number of containers into one logical unit called “POD”, easy to manage and deploy
Features
- Automated bin packing: via packaging software and automatically placing it/containers based on their resource requirements and other constraints, while not sacrificing availability. Mix critical and best-effort workloads in order to drive up utilization and save more resources.
- Service Discovery and Load Balancing: Using auto networking and load balancing configurations
- Storage Orchestration: Automatically mount the storage system of your choice for the cluster, whether from local storage, a public cloud provider, or a network storage system such as NFS, iSCSI, GlusterFS.
- Self Healing: Automatically restarts containers that fail, replaces and reschedules containers when nodes die, kills containers that don’t respond to your user-defined health check, and doesn’t advertise them to clients until they are ready to serve.
- Automated Rollouts and Rollbacks: Progressively roll out changes to your application or its configuration, while monitoring application health to ensure it doesn’t kill all your instances at the same time. Making sure an update or rollback will not disrupt the ongoing traffic.
- Secret and Configuration Management: dDploy and update secrets and application configuration without rebuilding your image and without exposing secrets in your stack configuration.
- Batch Execution: In addition to services, Kubernetes can manage your batch and CI workloads.
- Horizontal Scaling: Scale your application up and down with a simple command, a UI, or automatically scaling based on CPU usage.
- Infrastructure as Code: Will discuss in later articles.
K8s Architecture
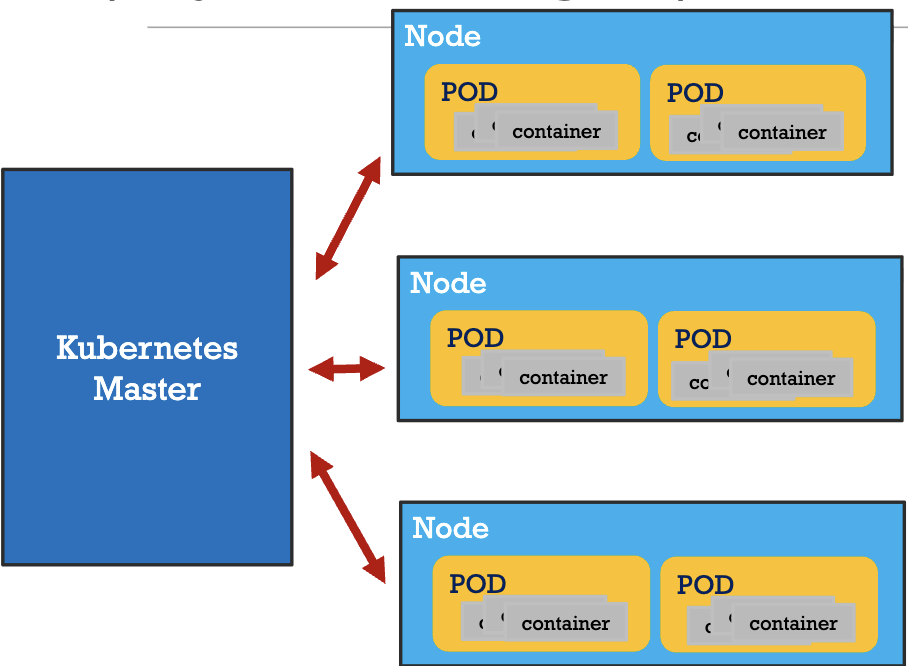
- Master controls the clusters and the nodes in it
- Nodes host the group of containers called POD
- Containers in a
PODrun on the same node and share resources such as filesystems, kernel namespaces, and an IP address. - Replication Controller at the
Masterensure that requested number of PODs are running on nodes - Load Balancer at the
Masterprovide load balancing across a replicated group of PODs
Master and Worker Node
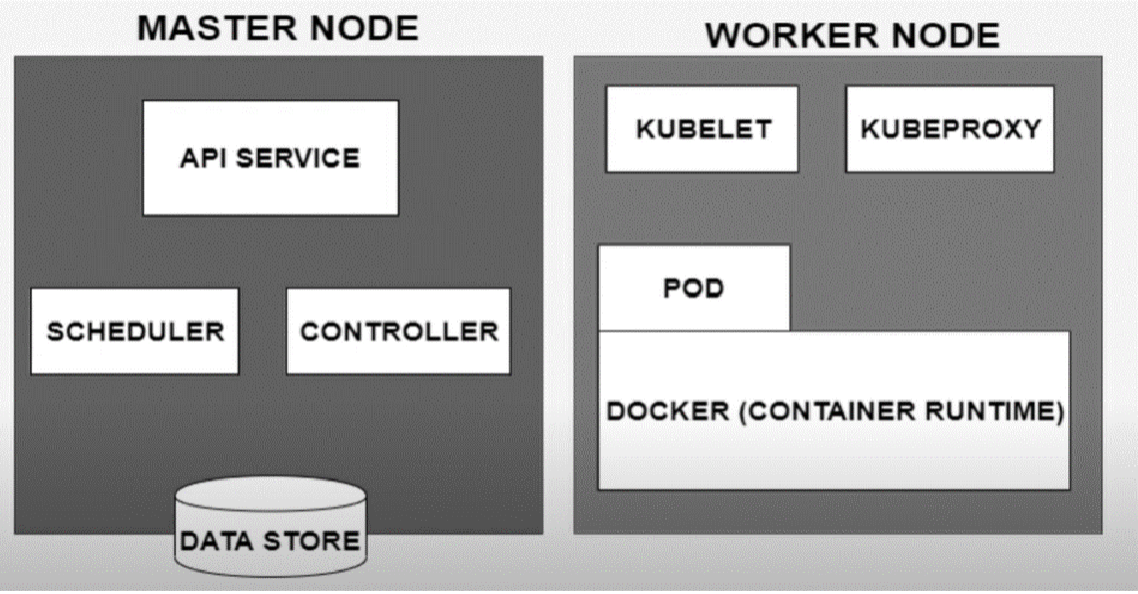
- Kubeproxy: is used for configuring Kubernetes Proxy Server.
- Kubelet: is the primary “node agent” that runs on each node. It can register the node with the Master Node using node specific information.Controller vs. Scheduler
- Controller: responsible for regulating the state of the system. Used by master to ensure the actual state of the system matches the desired state as specified in Kubernetes resource configurations (e.g., Deployments, StatefulSets). Nodes also can access
deployment.yamlto know the desired state.- Monitors the state of the cluster and takes action to reconcile the difference between the desired and actual states.
- Scheduler: determines where new Pods should be placed (i.e., scheduled) on the cluster nodes.
- When a Pod is created but not assigned to a specific node, the Scheduler evaluates available nodes and selects the most suitable one based on resource requirements, node health, other constraints, and policies.
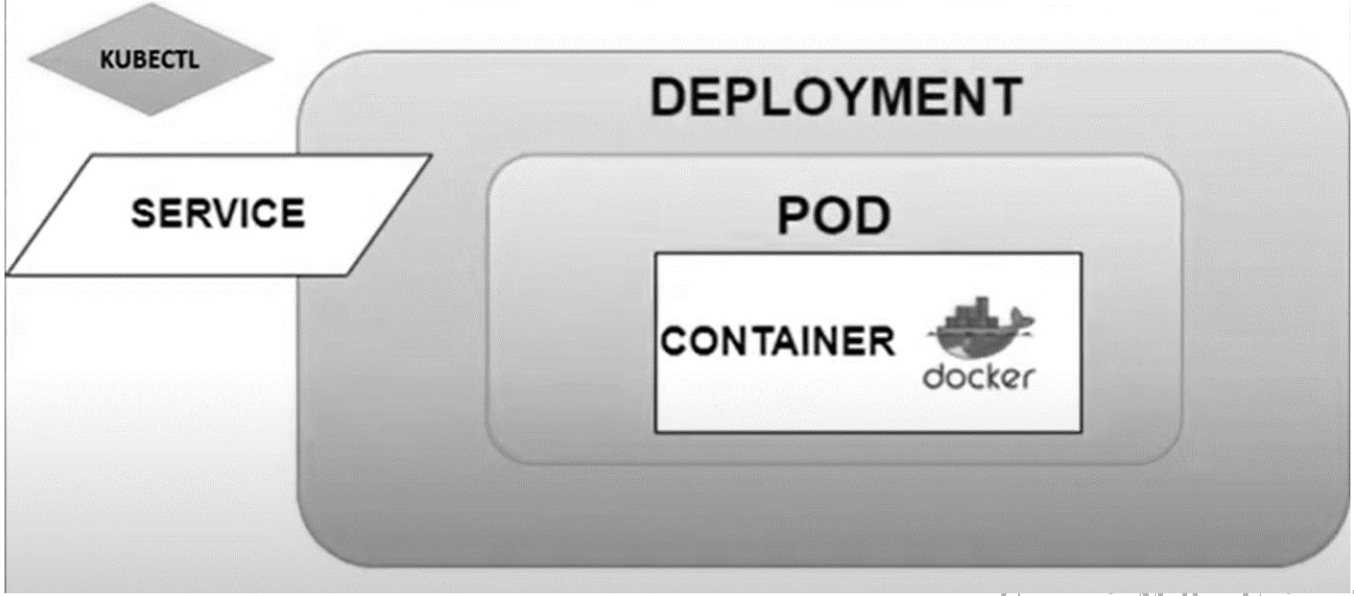
Kubernetes Service
An abstraction which defines a logical set of Pods running somewhere in your cluster that all provide the same functionality. and a policy by which to access them. The set of Pods targeted by a Service is usually determined by a label selector.
- When created, each
Serviceis assigned a unique IP address (ClusterIP) and a DNS name, which remains constant as the underlying Pods change. Cluster IPaddr is tied to the lifespan of theServiceand will not change while theServiceis alive.- Pods can be configured to talk to the Service and know that communication to the Service will be automatically load-balanced out to some pod that is a member of the Service.
- All the service-related configurations are specified in
services.yaml
Types of service:
- ClusterIP: Exposes the service(pod) on a cluster-internal IP. This is the default
ServiceType. - NodePort: Exposes the service on each Node’s IP at a static port (the
NodePort) to external traffic by fowarding traffic from the port on each node of the cluster to the container port. AClusterIPservice, to which theNodePortservice routes, is automatically created. It is cheaper, because has no actual traffic control. - LoadBalancer: Also exposes the service externally, but using an extra load balancer from cloud provider. It does not have an exposed physical port.
NodePortandClusterIPservices, to which the external load balancer routes, are automatically created. (It is more expensive, because of traffic distribution management(TDM))
Deployment + Service
Commands on GKE
- Create a GKE cluster:
gcloud container clusters create \
  —machine-type e2-standard-2 \
  —num-nodes 2\
  —zone us-central1-a \
  —cluster-version latest \
  mykubernetescluster
kubectl get nodes: list all nodes in the clusterkubectl get pods: list all pods in the clusterkubectl apply -f deployment.yaml: create deployment fromdeployment.yamlfile. It also creates the pods defined in the deployment file.kubectl get deployments: list all deployments in the clusterkubectl apply -f service.yaml: create service to expose app to external traffic.kubectl scale deployment <deployment-name> --replicas=<number-of-replicas>: scale the number of replications in a deployment refer to the number of pods in a deployment- auto-scaling:
kubectl autoscale deployment <deployment-name> --min=<min-replicas> --max=<max-replicas> --cpu-percent=<target-cpu-utilization-percentage>- e.g.
kubectl autoscale deployment nginx-deployment --min=2 --max=10 --cpu-percent=80where cpu percent is the average cpu usage across all the pods. here it is using HPA(horizontal pod autoscaler) kubectl get hpa: list all the HPA in the clusterkubectl delete hpa <deployment-name>: delete the HPA for a deployment- 2 types of auto-scaling:
- Horizontal Pod Autoscaler (HPA): scale the number of pods replicas up or down in a deployment based on cpu/memory usage or other custom metrics. It modifies the number of pods to balance load.
- Vertical Pod Autoscaler (VPA): automatically adjust the cpu and memory requests/limits for the containers in the pods, so it is kind of changing the size of pods, without changing the number of pods.
- To debug K8s application: https://kubernetes.io/docs/tasks/debug/debug-application/debug-running-pod/
YAML
Basics
- YAML (YAML Ain’t Markup Language) is a human-readable data serialization standard that can be used in conjunction with all programming languages and is often used to write configuration files.
- There are two main structures in YAML: Maps (key-value pairs) and Lists (ordered lists).
- Maps: You can use map when you are trying to assign a scalar value
- Example:
name: John Doe
age: 30
apiVersion: v2.4
kind: pod
- Example:
- Lists: sequences of objects that are treated as a single unit with the same key
- Example:
containers:
- name: webserver1
  image: nginx:latest
  ports:
  - containerPort: 80
- name: database-server
  image: mysql:5.7
  ports:
  - containerPort: 3306
- Example:
- Maps: You can use map when you are trying to assign a scalar value
Create Pods
- A
Podis the smallest and most basic deployable object in K8s. A Pod represents a single instance of a running process in your cluster. - Each pod can obtain one or more containers, such as Docker Containers.
- When a Pod runs multiple containers, the containers are managed as a single entity and share the Pod’s resources. Generally, running multiple containers in a single Pod is an advanced use case.
- Pods also contain shared networking and storage resources for their containers:
- Network: Pods are automatically assigned unique IP addresses. Pod containers share the same network namespace, including IP address and network ports. Containers in a Pod communicate with each other inside the Pod on localhost.
- Storage: Pods can specify a set of shared storage volumes that can be shared among the containers.
- You can consider a Pod to be a self-contained unit, isolated “logical host” that contains the systemic needs of the application it servers.
- A Pod is meant to run a single instance of your application on your cluster. However, it is not recommended to create individual Pods directly. Instead, you generally create a set of identical Pods, called
replicas, to run your application. Such a set of replicated Pods are created and managed by aDeployment.
Deployment
A deployment is a file that defines a pod’s desired behavior or characteristics. You create it to:
- Ensure workload availability
- Scale workload
- Deployments can be paused, edited and rolled-back
- Simplify the interface with external network
Example code:
apiVersion: apps/v1
kind: Deployment
metadata:
    name: nginx-deployment # Deployment name
    labels:
        app: nginx
spec:
    replicas: 3
    selector: # defines how the created ReplicaSet
    # finds which Pods to manage
        matchLabels:
            app: nginx
    template:
        metadata:
            labels:
                app: nginx
        spec: # We will run one Pod
        # containing one container
            containers:
                - name: nginx
                image: nginx:1.14.2
                ports:
                    - containerPort: 80
To create it, we run: kubectl apply -f deployment.yaml
Service
- Motivation: We need a way of consistently being able to access our pod-set even if the pods themselves are recreated or lost. This should be transparent to any application or other pods trying to access this pod-set.
- Example: assume we have a Kubernetes deployment that contains web application and a database. When a user searches from our website’s frontend, the search request is directed to a set of pods where our database is defined. If the database pod goes down, Kubernetes master will recreate it, and the frontend will not be aware of this. The search request should still be acknowledged and fulfilled as usual.
- Definition: an abstract way to expose an application running on a set of Pods as a network service.
- Example code:
To create this service, we run:
apiVersion: v1 kind: Service metadata: name: nginx-service # Service name labels: app: nginx spec: type: NodePort # Service type selector: app: nginx # a selector that the Service uses # to match and identify the pods in # Nginx Deployment, because the deployment # and the pods also have the exact same label. # This is how all incoming requests to this Nginx service # will be automatically routed to the Nginx deployment ports: # Using this NodePort, will be able to access the Nginx # service on all K8s nodes via port 30500 - protocol: TCP port: 80 targetPort: 80 nodePort: 30500 # points to our Nginx deploymentkubectl apply -f service.yaml
Reading
Kubernetes basics first 6 chapters
Deploy a Docker containerized web app to GKE
Last modified on 2025-11-23